
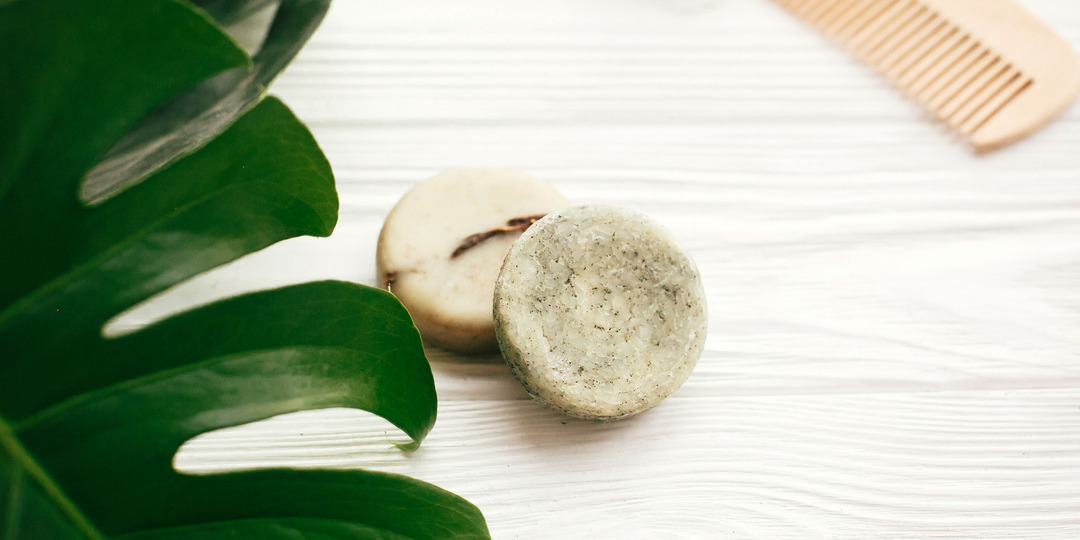
Want soft and shiny locks? Conditioning your hair is one way to achieve that. Do you know you can prepare your very own conditioner bars?
Conditioner bars are available commercially, but do we know what goes into them? A homemade conditioner bar is one way to ensure a chemical-free, natural, and affordable bar that can also improve the health of your hair and scalp.
Let’s learn more about conditioner bars and how to make them right at home, shall we?
What Is a Hair Conditioner Bar?
A conditioner bar is a hair conditioner in solid form. Diy conditioner bar is becoming quite popular these days, and the good news is that they’re very easy to make. The icing on the cake – a conditioner bar is affordable too!
Benefits of Homemade Hair Conditioner Bars
Making your own homemade conditioner bars is one way to ensure they’re chemical-free, free from harmful or damaging ingredients, and know what goes into them.
A DIY conditioner bar is more affordable as compared to commercial conditioner bars.
Conditioner bars are easy to make and have ingredients that are readily available if you’re DIY or buy.
They’re frugal because they last much longer than liquid conditioners do.
A conditioner bar is travel-friendly and easy to carry around or even store and use at home. Requires minimal space.
You can make your own conditioner bar variations, try out different conditioner bar recipe options, and choose what works best for you.
You can modify conditioner bar recipes to suit your preferences and requirements.
They’re good for your hair and scalp.
Depending on the ingredients chosen, conditioner bars are nourishing.

Basic Recipes for a Hair Conditioner Bar
Making a conditioner bar is easy, and the recipe is versatile. So, let’s get started, shall we?
Cocoa Butter Conditioner Bar

We’re using cocoa butter as our base for this conditioner bar. Not only is it a hard butter, but it’s also nutrient-rich and smells wonderful. Chocolate, anyone?
Essential Ingredients and Their Benefits
- Cocoa Butter – ½ Cup
- Coconut Oil – 4 Tbsps.
- Vitamin E Oil – 0.5 Ml
- Vitamin B5 – 1 Tsp.
- Emulsifying Wax – 1 Tsp.
- Myrrh Essential Oil – 10 Drops
Cocoa Butter
Smells chocolatey and overall nice. This is also a nourishing and moisturizing butter. It’s also hard, so it retains the bar’s shape and hardness without you having to worry about melting much.
It’s an incredible moisturizer and conditioner and keeps your hair and scalp healthy. It adds softness and shine to your hair, besides keeping split ends at bay.
Coconut Oil
Incredibly moisturizing and nourishing, it’s also a great conditioner and keeps dandruff and other scalp issues at bay. It keeps your hair and scalp healthy and dryness at bay and prevents split ends and hair breakage. Best of all, it’s a great hair care ingredient overall that’s also affordable and versatile.
Vitamin E Oil
Not only is this nourishing, but Vitamin E oil will also extend the shelf life of your conditioner bars. It isn’t called a hair care vitamin without a reason; what’s not to love about those added benefits?
Vitamin B5
It conditions your hair and adds shine and softness, besides improving hair health. It keeps split ends and bay, forming a protective layer on your hair.
Emulsifying Wax
A conditioning aid that adds shine and softness to your hair. It also nourishes your hair and scalp and takes your conditioner bars to the next level!
Step-by-Step Process
Melt together cocoa butter, emulsifying wax, and coconut oil in your double boiler.
Once melted, remove it from heat and set aside to cool.
Once it cools down a little, add the remaining ingredients and mix well.
Transfer to molds and let it dry.
It takes 48 hours for a thoroughly dried conditioner bar, and if you let it harden completely, it lasts longer. So, let it dry completely before removing it from the molds.
Done!
How To Use
Wet your hands and, if needed, conditioner bars too.
Rub along on your hands and apply on wet and washed hair.
Let it sit for a couple of minutes before rinsing off.
Let your hair air dry and style as usual.
Notes
You can use shea butter or other kinds of butter like mango butter or kokum butter along with or instead of cocoa butter. The texture, however, will be softer for your conditioner bars, but for those who don’t prefer or can’t use cocoa butter, feel free to swap to suitable kinds of butter of your choice for this conditioner bar recipe.
You can use any essential oil of your choice for the conditioner bars. We have used neutral Myrrh oil, so both men and women can use it, but you can change the essential oil or even use a blend of essential oils for your conditioner bars.
We have not used a broad-spectrum preservative, though, for larger batches, or when you’re planning to take it to the next level, like selling within your circle of friends, you can consider adding a preservative to extend the shelf life of your conditioner bar.
Don’t worry if you don’t have a double boiler. You can do a makeshift one by placing a large pan on your stove, a small stand to hold up a smaller vessel, and placing the smaller vessel on top of the stand.
Make sure the smaller vessel does not touch the larger vessel directly and that the heat comes from water. Your double boiler is ready! Make sure you gently heat the ingredients on low flame.
Shea Butter Conditioner Bar

While the name is Shea, we’re adding a few helpings of other kinds of butter to this nourishing conditioner bar recipe. Try this conditioner bar recipe for a luxurious spa experience right at home!
Essential Ingredients and Their Benefits
- Cocoa Butter – 6 Tsps.
- Shea Butter – 9 Tsps.
- Mango Butter – 6 Tsps.
- Beeswax – 6 Tsps.
- Coconut Oil – 6 Tsps.
- Avocado Oil – 2 Tsps.
- Frankincense Essential Oil – 25 Drops
Cocoa Butter
We have already spoken about cocoa butter, but we’ve used less of it here to make the conditioner bar lighter. Some can’t use cocoa butter due to the problem of it clogging pores.
So, as an alternative, we’re reducing cocoa butter and replacing it with other butter here. However, cocoa butter is very nourishing, moisturizing, and conditioning, though it’s a denser butter.
Shea Butter
Light, nourishing, and moisturizing, Shea butter is suitable for everyone and doesn’t clog pores. However, it’s also softer and very beneficial for your hair and scalp. It is an emollient and locks in moisture without weighing down your hair. It is also hydrating and leaves your hair soft and shiny.
Mango Butter
It’s a great scalp condition that also seals in moisture to prevent dryness. It reduces hair breakage, strengthens hair follicles, prevents hair fall, controls frizz, and improves your hair volume. Want soft and lustrous hair? Mango butter is your friend!
Beeswax
Since we’re using softer butter, beeswax gives stability to the conditioner bars you’re preparing.
Coconut Oil
Coconut oil conditions hair, prevents protein loss, and strengthens hair. It combats dandruff and other hair and scalp issues, including dryness, itching, hair fall, etc. It is also nourishing and moisturizing.
Avocado Oil
Want shiny and soft hair? Avocado oil isn’t called liquid silicone for nothing. Add this to your conditioner bars for lustrous and shiny locks. It’s also a great moisturizer, nourishes hair, and adds a protective coating to your hair.
Step-by-Step Process
Measure the ingredients – beeswax, shea butter, cocoa butter, mango butter, avocado oil, and coconut oil and add to your double boiler.
Once melted, remove from heat and set aside to cool slightly.
Add in the essential oil and mix to combine.
Transfer to molds and let it set.
Done when the conditioner bars are ready to be removed from the mold.
How To Use
Wet your hands and the conditioner bar.
Run along on your hands and apply on your washed and wet hair.
Wait for a couple of minutes before rinsing off.
Air dry and style as usual.
Notes
You can use any essential oils of your choice for this homemade conditioner bar recipe.
You can choose the butters as per your preference or requirement.
You can choose the carrier oils you’d like to use and use them in place of the oils suggested in this conditioner bar recipe.
Basic Conditioner Bar with Preservative

While conditioner bars don’t need preservatives, considering they’re solid and don’t include any water-based ingredients, there might be a possibility of mold or microbial infestation depending on where you stay.
This homemade conditioner bar recipe uses true preservatives for those scenarios so your product doesn’t go rancid or infested with microbes. However, if you are prudent about keeping the product dry and stored well at all times, you might not need a preservative. So, there you have it, and it’s your choice to go with it or without in your conditioner bar recipe!
Essential Ingredients and Their Benefits
- Cocoa Butter – 1 Tsp.
- Coconut Oil – 1 Tsp.
- Emulsifying Wax – 70 Gms.
- D-Panthenol – 2 Gms.
- Ylang Ylang Essential Oil – a few drops
- Optiphen – 1 Gm.
- Cetyl Alcohol – 10 Gms.
Cocoa Butter, Coconut Oil, and emulsifying Wax are already covered, so we’re going over the other ingredients used in this conditioner bar recipe.
D-Panthenol
This ingredient is a must in your conditioner bar recipe. It adds texture to your hair and makes it look vibrant, shiny, and bouncy. In short, if you want soft and silky hair, you’ll not skip this ingredient in your hair care recipes.
Optiphen
This is our preservative for this homemade conditioner bar recipe. You can use any preservative and measure it according to the recipe quantity requirement.
Cetyl Alcohol
Want shiny and sleek hair? Cetyl alcohol is just what you should add to your conditioner bars for shiny and sleek hair. It makes your hair shiny and seals in the cuticles, making it softer. It’s also incredibly moisturizing.
Step-by-Step Process
Measure and add the Cocoa Butter, Emulsifying Wax, Cetyl Alcohol, and Coconut Oil to your double boiler.
Once melted, remove from heat and set aside.
Once it cools slightly, measure and add all the remaining ingredients and mix to combine.
Pour into molds and let it set.
Done once they’re ready to be removed from their molds.
How To Use
Wet your hands and the conditioner bar and run along your hands.
Apply the conditioner to your hair and wait for a few minutes before rinsing it off.
Air dry and style as usual.
Notes
You can choose any preservative of your choice for this conditioner bar recipe – depending on your requirement, there are natural options, too.
You can choose any essential oils in this recipe.
Safety Precautions
Don’t use any ingredients you’re allergic to.
If you are in doubt about any ingredient, do a patch test of the conditioner bar first.
Don’t apply the product to your hair or scalp without doing a patch test first.
If you see any adverse reaction, even mild, discard the conditioner bar batch and start afresh after identifying what ingredient is the issue.
Storage and Usage Tips
You can store the extra conditioner bars in an air-tight mason jar or any air-tight jar.
The bar you’re using can be stored on your bathroom countertop in a soap case that drains and doesn’t collect water, so it can dry off.
You don’t need any separate space or jar to store these in the bathroom cabinet.
Conclusion
Going DIY can be daunting and scary initially. But once you’re trying out different recipes and becoming more and more comfortable, the results will be well worth the effort.
The recipes given here are natural and quite easy. If you haven’t tried DIY hair or skin recipes, this is a good place to start.
Do give these recipes a try and let us know how you like them and how they worked for you. As always, feel free to tweak the recipes to suit your requirements and preferences.
Don’t have time for DIY recipes? We’ve got your back with a range of premium and vegan hair care cosmetics from Vitamins Revive. Do check out their online store to know more about their products.
We love hearing from our readers. If you have any questions, feedback, or even requests, feel free to reach out to us.
FAQs
How long will a conditioner bar last?
It lasts for a good few months, depending on your usage frequency. It should last you for anywhere from 60 – 100 washes if it’s a small-sized bar, depending on your hair length and other factors.
How often can the conditioner bars be used?
It’s ideal for use once or twice a week. You can check your requirements and alter the frequency accordingly.
Can I substitute Cocoa Butter with other butter in a conditioner bar?
Yes, you can substitute with mango Butter or even other butters, but the conditioner bar will be a lot softer depending on the butter you choose.
Why does my conditioner bar melt when using coconut oil?
The oil of coconut melts in tropical climates or when the temperature goes over 76 degrees Fahrenheit. So, if you live in warmer climates, you can refrigerate your bar or store it in a cool place and away from heat.
What to do when the bar starts breaking up?
We don’t want to waste a good conditioner bar, however small it is. Right? Add the scraps to a spray dispenser along with distilled water and shake. Your spray conditioner is ready!
What hair types need a conditioner?
A natural conditioner can be used by any and all hair types. Irrespective of the hair type, conditioner is an important part of the hair care routine for everyone. As long as you choose the natural conditioner bar ingredients to suit you, you’re good. Conditioning is not reliant on hair types.
Can we use homemade conditioner?
Absolutely, yes. As long as you check and follow the instructions of the recipe or swap for equivalents, you should be good to go, and pH levels aren’t altered.
Can everyone use a homemade conditioner?
Yes, the recipes given here are suitable for everyone.
Should I use a homemade shampoo bar if I am using a conditioner bar?
You can use a solid conditioner bar instead of a liquid conditioner bar recipe even when you’re not using shampoo bars.
Can I use fragrance oil in my own conditioner bar?
Yes, you can. But to keep it natural and to stay away from harmful or damaging chemicals, we use natural essential oils or extracts.
Can I use Jojoba oil?
Yes, you can use it along with or instead of the oils used in our natural conditioner recipes.
Should I use baking soda in conditioner bars?
We don’t use soda in our conditioner bars because it can cause dryness with frequent use.
Is a solid natural conditioner bat better than a liquid conditioner?
It is more eco-friendly, doesn’t need added space or plastic containers, and is healthier as we make our natural conditioner using organic ingredients.
Can we swap the essential oil listed in the recipe?
Yes, you can choose your favorite essential oil or even go with a blend as per your preference or requirement.
What’s the shelf life of conditioner bars?
They last six months and up when stored and used correctly.
Can those sensitive skin use conditioner?
Those with sensitive skin or scalp will find it more useful compared to others as it’s incredibly moisturizing and nourishing.


